
Mounting FileSystems and AutoFS in CentOS/RHEL 8
March 10, 2022I haven’t worked in an environment yet that didn’t share some sort of files over the network. Even some end users are trained to setup network drives and OneDrive/SharePoint syncing. Having multiple copies of the same file can be a dangerous thing (not talking about back-ups), and network sharing can help everyone keep a focused and (hopefully) tidier workspace.
I probably should be doing this in Rocky Linux, but frankly; my environment is already setup and I like my environment. First a few things to do this properly, you need two Linux server (preferably the same OS) and you need to decide which one is going to be the file server. Once that is decided, we need to check the nfs-server service. To do that, run:
systemctl status nfs-server

If your server does not have nfs-server installed, run
sudo dnf install nfs-utils
If your server shows nfs-server as inactive or not enabled, that’s fine for now.
Now, we need to decide on what files we are sharing. This really could be anything: ISO files, txt files, backups, etc. Since I don’t want to take up a bunch of space on my main partition, I’m just going to make some txt files. If you’re following along, run the same commands.
mkdir -p /export/nfs1
sudo touch /export/nfs1/sharefile{1,2,3,4,5}
And when we check:

After that, configure your export in /etc/exports. Pro tip: Share configurations need to be setup in /etc/exports, your shared directories/files can be anywhere on that server. It doesn’t need to be /exports in order to work properly.
vi /etc/exports

I have a previous entry in here–that will be pretty common in a production environment. I’m already thinking of /etc/fstab……….
Here’s the syntax of this configuration file.
First entry, directory/file to be shared = /export/nfs1
Second entry, IP address of the server we are sharing it to = Your second server. Mine is 192.168.223.135. You can also put a wildcard here. I’m sure the security team would love that too.
Third entry are your mount options. Read and write is pretty common, but you can do whatever you want here. You could do rw here, then on the second server adjust your mount options to be only read. Sync makes sure new requests are fulfilled until changes made by last request are written to disk. Basically, the nfs server share is up to date before anyone else can read or act upon it. Also, no_root_squash is not recommended to use. I’m on a non-production server, so I’m not worried, but here’s a Red Hat article explaining why:
Also, there are a lot of mount options to use. I’d highly recommend taking a look at them or bookmarking this next article to reference when doing this in your environment. 4.6 start the NFS server configuration area and mount options.
Ok, so my syntax is going to be /export/nfs1 *(rw,sync,no_root_squash)

With the configuration changes, we need changes to take effect. You can restart the service, bring it down then enable it, or just enable it if it wasn’t before. I’m going to stop and start it.
sudo systemctl stop nfs-server
sudo systemctl enable –now nfs-server
systemctl status nfs-server

Let’s check what we’re sharing out on this server.
showmount -e

That matches our /etc/exports file. Looking good so far. Now, we need to head over to the second server, and get this mounted.
Let’s see if server 2 can talk to server 1 and see the shared out files. My server 1 IP address is 192.168.223.134.
showmount -e 192.168.223.134
Now, this may seem a little odd since we have a wildcard on the nfs server. Keep in mind, the source server (nfs server) configuration says it can share with any server (the wildcard), the client (if you will) server, still needs to specify which source server it’s talking to. If you even tried a wildcard here, it wouldn’t work.

Everything is looking good so far. If you are not able to talk to the nfs-server, check they are on the same subnet and you can ping the IP address . If those two don’t seem to be the issue, then take a look at your firewalld settings. You may need to allow rpc-bind, mountd and nfs services. I’m not going to do a firewalld overview here, but the commands would be:
sudo firewall-cmd –add-service=mountd –permanent
sudo firewall-cmd –add-service=rpc-bind –permanent
sudo firewall-cmd –add-service=nfs –permanent
sudo firewall-cmd –reload
Let’s make our mount point on server 2.
sudo mkdir /mnt/nfs_share
And we’ll start with a temporary mount to check if it works.
sudo mount -t nfs 192.168.223.134:/export/nfs1 /mnt/nfs_share
This is the mount command with -t for mount type (nfs in this case), the IP address of server 1 (our nfs server), the location of the share directory and the mount location on server 2. Check for that specific mount with
mount | grep nfs1

Looks great. We can also check the mount point to see if the nfs-server files are there.

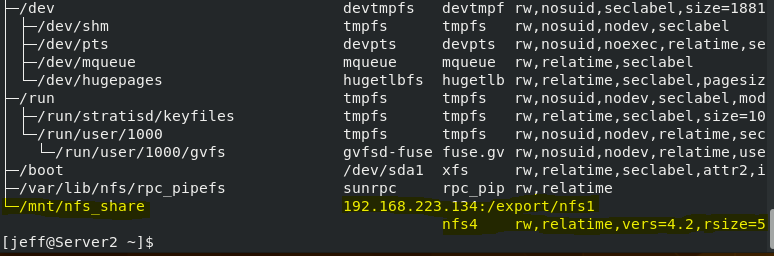
I also like to run this command because the output is really clean, and it can give you a bigger view into everything that’s mounted on your system.
findmnt

Since this is working properly, and I want this to come up whenever I reboot, I’m going to add this to my /etc/fstab file. First let’s unmount the share.
sudo umount /mnt/nfs_share
vi /etc/fstab
The entry we are adding is
192.168.223.134:/export/nfs1 /mnt/nfs_share nfs defaults,_netdev 0 0
If some of this looks familiar, good. It is similar to the mount command we just ran, but with some slight differences. We have the nfs server IP address, shared files, the mount location, the file type (nfs), then defaults,_netdev. Defaults is pretty standard with /etc/fstab, but the _netdev parameter tells the system not to mount this unless the network service is running.

Now after saving, all we have to do is run mount -a. That command will take every entry in the /etc/fstab file and attempt to mount it. No extra parameters required.

As we can see everything is back where it should be. And just for good measure.
findmnt
If you had a bunch of mounts you wanted to unmount all at once, you could run umount -a, but I wouldn’t do that in a production environment.
In the next article, I am going to go over autofs and look at some of the advantages it offers over doing these mounts manually.